Intro / Video Transcript
Showerheads can become old and out-of-date with time. If you're planning to change your's out, be sure to watch this video. This how-to guide will provide quick and easy steps for changing out your showerhead.
While it’s a rather simple project, there can be a lot of benefits to changing out a showerhead. Newer water-saving showerheads can save on your water bill. Some models mix water and air, so you end up getting a luxurious shower and never know you’re using less water.
You also might want to change out the showerhead for a model that includes features like adjustable flow settings. Or, you might be replacing all of the fixtures in the bathroom and want to the showerhead to match. Visit your local independent home improvement retailer to see all of the styles available.
Once you’ve chosen the style of showerhead you want, all you’ll need are a few simple hand tools and you’re ready to go. So let’s get started.
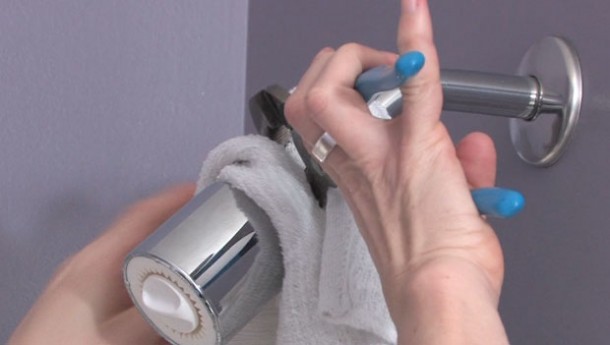
The showerhead attaches to the shower arm, which protrudes from the shower wall. Grip the showerhead with a pair of channel-locking pliers and loosen it by turning it counter clockwise.
If it doesn’t come off easily, try gripping the shower arm with another pair of channel-locking pliers or a pair of locking pliers. When you do that, you’ll want to protect the shower arm from getting marred by the teeth of the pliers. Wrap the teeth of the pliers with duct tape to keep that from happening.
Pull the second pair of pliers in the opposite direction you are loosening the showerhead. It’s important to not put a lot of pressure on the shower arm. Otherwise, you may end up breaking it and will have to replace it.
Before you install the new showerhead, wrap the threads of the shower arm with Teflon tape to provide a good seal. Be sure to wrap the tape clockwise around the threads.
Now thread on the new showerhead. You can use the pliers to finish tightening it, but don’t over tighten. Turn on the shower to check for leaks. That’s it.
Steps
- 1.

Grip the showerhead with a pair of channel-locking pliers and loosen the showerhead by turning it counter clockwise. It’s important to not put a lot of pressure on the shower arm to avoid breaking it.
- 2.

After removing the showerhead, apply Teflon tape clockwise around the threads of the shower arm to provide a good seal.
- 3.

Thread on the new showerhead turning clockwise.
- 4.

Use channel-locking pliers to tighten the showerhead by turning clockwise until the it is secure. Don’t over tighten.
- 5.

Turn on the shower to check for leaks.